
Who doesn’t love the crisp, clean look of a beautifully folded winter guard tarp? I think you would be hard pressed to find someone who likes to see a tarp look wrinkly underneath those bright gym lights. In order to ensure that you have that detailed refinement to your program’s winter production, follow this step-by-step guide for folding your very own Field & Floor FX digital floor tarp.
Supplies needed include…
- Two separate tape measurers, one needs to be long (approx. 100ft)
- A black sharpie
- One roll of tape (electrical, masking, duct, etc.)
- **This will be used for your sideline markers, director’s preference on which tape to use for this component
- A straight edge
- Two 6 foot long flag poles
- A tarp cart
Once you’ve collected all of the items listed above, you can begin to prep your floor for a perfect “first” fold.
The key to this process is PRECISION! Double check your measurements.
Outline the floor
Step 1: Stretch out your floor as flat as possible with the printed image side up.
Step 2: Place the longest tape measure down the length of the front sideline of the floor approximately 2 inches from the edge and tape it in place.
Step 3: With your sharpie, measure and mark the front sideline of the tarp every 2 1/2 feet starting on the left.
Step 4: Place a 2 inch piece of tape on top of every other mark (5 foot mark) approximately 1 inch in. It’s important to make sure your tape is centered on each mark. Fold the remaining inch of tape to the underside non-printed side of the floor.
Step 5: Repeating steps 1 thru 4, measure, mark and tape the back sideline. Be sure to start the tape measure from the same side as the front sideline.
Step 6: Repeat steps 1 – 4, measure mark and tape the left and right end zone sides beginning at the front and measuring to the back.
Marking the underside of the floor
These are the reference lines you will use when folding your tarp later on.
Step 1: Flip over 15 feet of tarp on both end zones to have the non-printed side up. Make sure the tarp is lying flat and flush with the tarp underneath it.
Step 2: Starting at the front sideline, place the smaller tape measure on the tarp starting at the first 2 1/2 mark in from the end zone on both the front and back sidelines.
Step 3 Using a straight edge draw a straight line every 5 feet from the tape measure to the edge of the floor.
Step 4: Repeat steps 1 thru 3 on the other end zone side making sure to start at the front sideline.
Step 5: Flip back both end zone sides to have the printed side up.
Folding the Tarp
Precision is KEY to this process. Do not be afraid to do a fold over again as it MUST BE PERFECT!
Step 1: Align individuals along the end zone of the floor tarp.
Step 2: Provide 2 additional individuals as monitors on each side (front and back).
Step 3: Provide 4 individuals at the opposite end zone to send air underneath.
Step 4: Stretch the longer tape measure between the 2 monitors on each side.
Step 5: The monitors should hold the tape measure slightly above and in between the second and third set of marks (ie. the second 2 ½ foot mark).
Step 6: Individuals along the end zone should line up one hand underneath the tape measure and grab the floor with a pinch grip.
Step 7: The monitors should verify that all hands are pinching in the proper location aligned with the tape measure.
Step 8: The monitors should count off to pull the first fold.
Step 9: The first pull will fold 2 ½ feet mark from the end zone leaving 2 ½ feet of floor at the edge. YOU WILL FOLD TO THIS POINT WITH EVERY FOLD!
Step 10: Once the first fold has been pulled and is perfectly placed, individuals should press out the folded edge at the 2 ½ foot and 5 foot marks to “set” the line. Be a stickler about each folded edge lining up on the splitting point between the first marker and the end zone edge of the tarp. The folds will tend to slide over time so it is better to go slower with this first initial folding process. Stay PRECISE!!
Step 11: Repeat this folding technique for the entire length of the floor. It also helps to have the three to four individuals that are sending air underneath the tarp to pull tight with every fold. This will eliminate any extra air pockets that could have snuck into the folds of the tarp.
Step 12: Once you have folded the entire length of the floor, you will take the excess two and half feet to fold over the mass of folded floor, a protective flap if you will. This will reveal your handy-dandy folding reference lines that we drew at the beginning.
Step 13: After you have folded over the protective two and half foot flap, have individuals pull the floor tight away from the center to eliminate any bumps or air pockets from the floor.
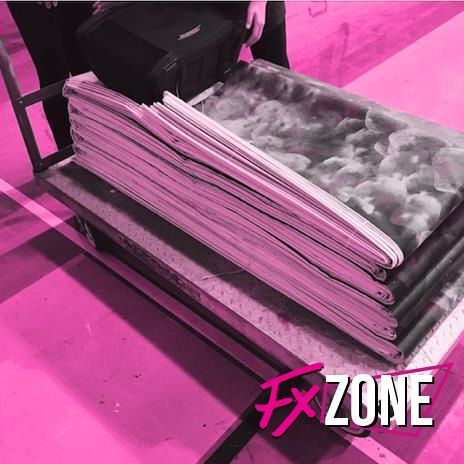
Folding the Floor Onto the Cart
Now it’s time to fold the floor onto the tarp. You will need your two flagpoles for this step.
Assign two individuals per flagpole to help set the horizontal folds of the tarp while it is being folded onto the cart. This step is just as if not more tedious than the first folds. Do not rush through this step. You will want to keep the floor pulled tight when lifted throughout this step.
Step 1: Place the first 5 foot by 2.5 foot rectangle onto the floor cart,
Step 2: The first flagpole team should set their pole centered on top of the 5 foot reference line and keep the flagpole pressed firmly down onto the tarp.
Step 3: Individuals needed to pull the tarp should be staggered along either side of the floor for lifting.
Step 4: Lift the floor and pull it forward to make the first fold stopping at the second 5 foot fold line.
Step 5: The first flagpole team should slowly remove the flagpole from the first fold and press their seam.
Step 6: The second flagpole team should set their pole centered on top of the second 5 foot reference line and opposite the first flagpole team. Keep the flagpole pressed firmly down onto the tarp. This step also has a tendency to slide with each fold along the way, so step back and make sure you aren’t folding a leaning tower of tarp onto your cart. This is aided by making sure your flagpoles are centered on the lines, and not butting up next to the line.
Step 7: Repeat steps 2 thru 6 until the floor has been folded onto the cart.
Setting the Seams
We’re almost done. This last step is optional but does help in setting the folds that you have just spent so much detailed time setting throughout our folding process. It’s beneficial to press the folds in by weighting the folded tarp mass with any type of heavy object you have at your disposal. Some examples of things you could possibly use… a few folded up tables, tuba cases, etc. Be sure that whatever is put on top of the cart is stable and balanced. The objects should not be able to slide off the tarp and harm the folded masterpiece of vinyl that is currently sitting on your tarp cart. Allow the floor to sit with the weights of your choosing for a few days to properly set the folds.
Voila!
There you have it! Your very own beautifully folded digital floor tarp. Taking the time to fold your tarp with such precision right off the bat will make for such an easier folding process during the remainder of your season. Fold it the same way as much as possible in order to help reinforce your folds, which in turn become drill-cleaning tools since they ultimately are tarp yard lines if you will. Thank you for your patience and enjoy performing on your brand new and freshly folded Field & Floor FX digital masterpiece.
Join Carmel High School as they show us their floor folding experience!
Rosie Queen is a color guard lifer and creative writer who currently resides in Huntington Beach, CA. Rosie has been blessed to be deeply involved in the marching arts since 1983. Rosie is obsessed with her dogs, color guard/marching band, national parks, and traveling.